Setting Up Apache Derby Plugins with Eclipse
I recently needed to do some development with Derby, the all-Java embeddable database that's now an Apache project. Since I use Eclipse for development, I noticed that there was a plugin available for development. Here's how to get the plugin setup up in eclipse. Note that I go the non-source route whenever possible. If you're looking to poke around in the source or make changes, you'll have to follow the instructions on the Derby website.
- If you haven't already, install Eclipse. I was working off of a new laptop, and grabbed v3.2.0. You'll need at least 3.1M6 to use the Derby plugin according to the docs. Download, unzip, start.
- Download the latest Derby release. I snagged 10.1.3.1. Unzip it to a folder
- Download the derby_core_plugin_10.1.1.zip file from the downloads page. Note that I couldn't find the exact copy, but rather a 10.1.2 version. All the better, right? It's located in a link labeld 'zip'.
- Here's where confusion sets in. The docs on the Derby site say to install the core, ui, and plugin.doc pluggins, but the referenced .zip only appears to contain the core. Where to get the UI plugin from? That's when I start actually reading the instructions carefully. To get any sort of UI functionality from Derby in eclipse, you must extract the UI and help source via svn and build it manually.
- At this point, you need a Subversion client to get the source. You can either a) Use SVN command line to checkout the source locally, or b) use the subclipse plugin to check it out from eclipse. 'A' is easier in this particular instance, but I normally use 'b', so I'll describe it here. 'A' users can safely checkout and skip forward to step 13.
- Since this is a fresh install of eclipse, I don't have the Subversion plugin installed. Thankfully, the Subversion guys do it right, and have a link for use with the eclipse update manager. A mere 15 clicks later (totally unworthy of writing about, see here for instructions), I'm ready to go with subversion.
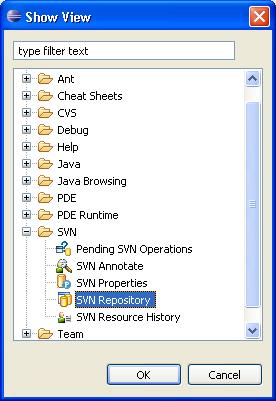
- Now for the fun stuff. Open the subversion repository view by going to Window->Show View->Other and selecting it from the tree.

- Now add a new SVN repository by clicking on the toolbar icon shown:

- Enter the url given on this page. At the time of writing, it was
https://svn.apache.org/repos/asf/db/derby/code/trunk/plugins
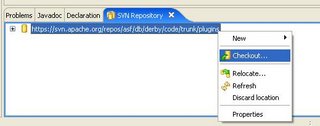
- Now in your SVN Repository view you should have an entry for the derby site. Right click on it and select 'Checkout...' from the menu. I chose 'Check out as a project in the workspace'.
- We actually don't want a direct project from the checkout, since we are checking out a tree with 2 projects in it. I named the project 'DerbyPlugins' and hit 'Finish'.
- Once you have your 'DerbyPlugins' project, this means you have the source tree and an eclipse project around it. We want to delete the latter, and only the latter, so right-click on it and choose 'Delete...'

In the dialog, make sure to choose 'Do Not Delete the Contents' and hit 'Yes'
- Now you want to create the real projects. Choose File->Import...->Existing Projects into Workspace. For the root directory, navigate to your workspace and find the 'DerbyPlugins' folder. Now find the eclipse/org.apache.derby.ui folder and hit OK and Finish to close the dialog.

- At this point, you can skip to the next step, or test it out. To test, choose Window->Open Perspective->Other->Plug-in Development. Then right-click on your project and select Run As->Eclipse Application. This will launch a new eclipse runtime with the plugin active. You can create a new project in the new runtime, and you should have an Apache Derby option on it's right-click context menu:

- To create the deployable plugin, right-click the project (first close the 2nd eclipse window if you did step 14) and choose Export... In the resulting dialog, choose Deployable plug-ins and fragments and hit Next:

- In the next page, make sure that the org.apache.derby.ui checkbox is checked. Choose 'Directory' as the destination, and give it a folder to output to:

Under the 'Options' tab, clear all checkboxes:
Hit 'Finish' - Now you have a deployable directory that just needs to be copied over to your eclipse install. Navigate to the folder you chose to output to in the previous step, and copy the org.apache.derby.ui_1.1.0 folder. Now go to your eclipse home directory, find the plugins folder, and paste it there.
- Restart eclipse (If you have a FAT32 filesystem, you will likely also have to follow the directions here to workaround an eclipse bug with this type of plug-in install). Now when you right-click on a Java project, you should have an Apache Derby menu item. Adding the Derby Nature to a project will add the necessary jar files to develop with, and also give you subsequent access to the Derby tools.


posted by bit_runner @ 2:18 PM
0 comments
![]()
![]()

0 Comments:
Post a Comment
<< Home