Wednesday, March 07, 2007

Moleskine Holster for iPod 2G Shuffle Hack


My GTD system has de-evolved over the years from PDA's, to Outlook, to a SmartPhone, to GTDTiddlyWiki, and now finally to a Moleskine notebook. I'm happiest with the Moleskine because it's simply easier and more convenient to enter text, but I miss the all-in-one-ness of my SmartPhone. Juggling my cell, keys, Moleskine, and iPod Shuffle is a drag, so here's a really simple hacked solution for conveniently keeping your tunes and notebook together: Cut a hole in it...
  • Step 1: Accept that you're going to scar a perfectly good Moleskine. It's ok, even if you screw up, they're not incredibly expensive, and you'd probably be replacing it in a few months anyway.

  • Step 2: Assemble the tools. You'll need an X-Acto knife, cutting board, ruler (unless you trust my measurements), pencil, iPod 2G Shuffle, and your notebook.


  • Step 3: Measure. You need a rectangular hole in the cover sized and placed such that the grips of the clip fit snugly through without much room for jiggling. The top of the cover should butt up against the inside of the clip hinge:


    I found that the bottom edge of the hole should be 1" from the top cover, it should be 1/4" tall, and 1 1/16" wide. These figures ended up working well for me, but take them with a grain of salt.

    Mark the lines for cutting on the inside cover with a pencil.


  • Step 4: Cut. Place the notebook on a cutting-safe surface and make several careful cuts on each line with the knife. It took about 5 minutes of slow and steady cuts to break through the cover.


    Lucky me! - the hole nicely frames my name from the identification page, so even when the iPod is not attached, it looks functional.


  • Step 5: Attach the iPod and enjoy! It should have a snug fit and not come loose even when opening the cover. The clip is thin enough that the Moleskine can be closed and strapped easily when the iPod is on.


Labels: , , , ,

Monday, December 18, 2006

Power to the consumer with Greasemonkey

Fool me once, shame on you... plus I'll build a greasemonkey script to
filter you out of my daily browsing so that we don't get into that whole 'fool me twice' scenario.

This simple how-to is for all the online bargain hunters that have been screwed over by an online retailer. My personal inpiration came from TigerDirect.com. I made only 1 purchase from them, but that and hindsight research into their Better Business Bureau record was enough to swear them off forever.

Unfortunately, they kept popping up. I like to surf deal sites like dealnews.com and techbargains.com. Nothing was more frusterating than scanning through the site and seeing an item you've been waiting for... only to read the fine print and see it's from your online nemisis. Well, I finally got around to building a simple Greasemonkey userscript for Firefox that will filter TigerDirect (or modify it to match your own retailer of choice) out of my deal sites for good.

Let's tackle Dealnews.com first. Looking at the HTML source, we can see that each deal entry is actually a sequence of 4 div elements for the item image, headline, item description and a timestamp:

<span style="font-family: courier new;"><div class="imgdiv"> ... </div></span>

<span style="font-family: courier new;"><div class="article art-headline"> ... </div></span>

<span style="font-family: courier new;"><div class="article article-body"> ... </div></span>

<span style="font-family: courier new;"><div class="timestamp"> ... </div></span>


The approach I'll take is to match a regular expression against the content of the "article article-body" div elements. If the content of that div contains the text "TigerDirect", then I'll set the display property of the div and its image, headline and timestamp to 'none'. Of course, there is a risk of blocking out the wrong items. Sometimes a deal article will compare the deal price to other similar prices. In this case, you could block out deals simply b/c they compared the price to your retailer. I'll take that chance... here's the script:

var regEx = /tigerdirect/i;
var elems = document.getElementsByTagName('div');

for (i=0;i if (elems.item(i).className == 'article article-body'
&& regEx.test(elems.item(i).innerHTML)) {

for (j=i-2;j<=i+1;j++) {
elems.item(j).style.display='none';
}
}
}

It's even easier to do this at TechBargains.com. Each deal entry there is completely contained in a single div element of class 'Content', making an equivalent script look like:

var regEx = /tigerdirect/i;
var elems = document.getElementsByTagName('div');

for (i=0;i if (elems.item(i).className == 'Content' &&
regEx.test(elems.item(i).innerHTML)) {
elems.item(i).style.display='none';
}
}


From here, you can customize it to suit your needs. Want to still have the deals on the page, but just flagged? Try a line-through text decoration or background color style instead of hiding the div. Want to block out more than 1 retailer? Just modify the regular expression. Here's one to add walmart to the blocked list:

regEx = /(tigerdirect)|(walmart)/i;

That's it! You can roll your own or modify the versions here (dealnews) or here (TechBargains). Save it as a user.js userscript, install it in GreaseMonkey, map it to the site URLs, and say goodbye to your least favorite retailers.

Labels:

Sunday, September 17, 2006

Automated Web Testing Bliss: Integrating Selenium IDE/RC and FitNesse

Strategies for developing web application tests vary, but most are difficult to implement, maintain, or automate. In this entry, I show how to take a no-new-code approach to defining new testcases with 2 popular open source testing tools. Tests are recorded and executed in Selenium, but saved, maintained, and controlled in wiki-based FitNesse.

I've been a big fan of the Fit and FitNesse testing frameworks for about a year. As good as Fit is for writing and collaboratively maintaining tests, testing web app UIs was still very challenging. When I first tried Selenium and the Selenium IDE recorder application, I was excited, but not sold... I didn't want to give up what FitNesse was giving me in terms of collaborative, story-based test development that could include non-UI tests and database setup in the same page. I believe the most important quality of a testing framework is how hard it is to maintain it, and FitNesse made things very, very easy.

After seeing Jeffrey Palermo's blog entry on integrating Selenium RC and FitNesse to create Domain-Specific languages, I was inspired. I wanted the opposite goal, however: to create an entirely domain-generic combination of selenium and FitNesse, so that I could record web app tests in Selenium IDE, save them to FitNesse, and run them from FitNesse without having to write any new testing code (easy maintenance!). I wanted a Fit Fixture that could understand the output of Selenium IDE (click this link, verify this text, etc), and use it to drive Selenium RC automatically. Here's how I accomplished this with 1 Fit Fixture and a bit of JavaScript:

The Solution

Here's a summary of the goals of the system:

  1. Use Selenium IDE to record test cases... no manual coding allowed!

  2. Save the test cases to FitNesse, allowing easy team collaboration, documentation, and updates as well as inclusion data-driven operations like database setup defined in one browser-accessible place.

  3. Execute the tests as suites in FitNesse, either manually from the wiki or automatically from one of the many interfaces to FitNesse (maven, ant, cruisecontrol, scripts)

  4. Use Selenium RC automatically from FitNesse to run the UI portions of tests in both IE and FireFox

  5. See the results in FitNesse

  6. Never have to write or build test-specific code for UI changes
And here are the steps to get to that very scenario:


STEP 1: Create a (Single) FIT Fixture

The first step (after installing FitNesse, Selenium IDE, and Selenium RC if you haven't already, of course) was to define a DoFixture class to act as a proxy to Selenium commands. I picked a common subset of functionality to start out with, including opening a page, clicking links/buttons, setting form values, and verifying text. A partial listing of the fixture in C# is shown below.


public class SeleniumFixture : DoFixture {
public static ISelenium SELENIUM
{
get { return _selenium; }
set { _selenium = value; }
}

//...

public void StartBrowserPointingToHostOnPortWithURL(String browser, String host, int port, String baseURL)
{
BASEURL = baseURL;
BROWSER = browser;
HOST = host;
PORT = port;

SELENIUM =
new DefaultSelenium(HOST,
PORT,
"*" + BROWSER,
BASEURL);
SELENIUM.Start();
}

public void Stop()
{
SELENIUM.Stop();
}

public void open(String url)
{
SELENIUM.Open(url);
}

public void SetTo(String control, String value)
{
SELENIUM.Type(control, value);
}

public void ClickAndWait(String where)
{
SELENIUM.Click(where);
SELENIUM.WaitForPageToLoad(15000);
}

public void Click(String where)
{
SELENIUM.Click(where);
}

public bool VerifyTextPresent(String what)
{
return SELENIUM.IsTextPresent(what);
}
}


This fixture class is just a very thin wrapper around the Selenium RC functionality. It contains no app-specific code, making it reusable across multiple web apps. To make the transition from Selenium IDE to FitNesse fixture easier, I generally created method names to exactly match the command names generated by Selenium IDE. In certain cases (for the sake of readability in the FitNesse pages) I chose different namings, such as the Selenium 'type' command, which fills in text fields by name with a value. In a FitNesse table by default, this would read as 'Type Username Josh'... good, but not completely obvious. I renamed this function in my Fixture as: setTo(String control, String value), which will become a much more readable "Set Username To Josh" in FitNesse.

To test this out, create a FitNesse wiki page with the following test table (substitute your environment-specific values for host/port/etc:


!define COMMAND_PATTERN {%m %p}
!define TEST_RUNNER {dotnet\FitServer.exe}
!path dotnet\*.dll
!|start browser|firefox|pointing to host|localhost|on port|4444|with url|http://www.google.com|
|open|/webhp?hl=en||
|Set|q|To|fitnesse+wiki|
|clickAndWait|btnG||
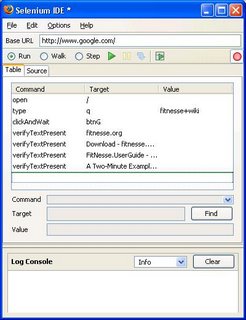
|verifyTextPresent|fitnesse.org|

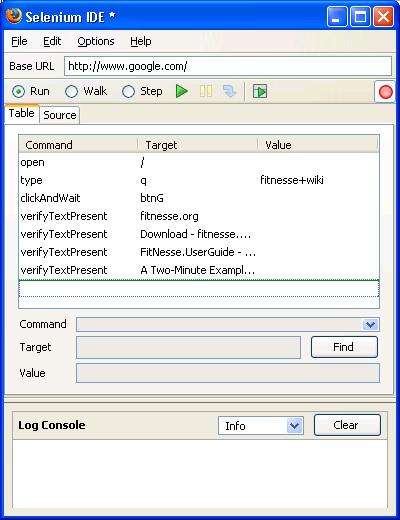
Set the properties of the page to indicate that it is a test, and then run by clicking the 'Test' link. You should see a Firefox window pop up in the background and run a search, verifying that fitnesse.org is among the top 10 results returned.


You can see how easy it is to modify this test in Fitnesse... say that you want to also verify that the high-level categorical links are shown in the search result. Add the following lines to the end of your fitnesse test and re-run it... you've changed the test entirely from the wiki!


|verifyTextPresent|Download - fitnesse.org/FitNesse.DownLoad|
|verifyTextPresent|FitNesse.UserGuide - fitnesse.org/FitNesse.UserGuide|
|verifyTextPresent|A Two-Minute Example - fitnesse.org/FitNesse.TwoMinuteExample|


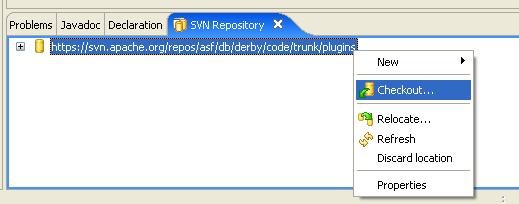
STEP 2: Extend Selenium IDE

All this is good, but now we need to bring Selenium IDE into the mix so that we can just record browser interactions instead of having to write all those wiki tables by hand. Selenium IDE has built-in support for saving recorded testcases as HTML as well as several variants of code snippets for Selenium RC (C#, Java, Perl, Python, and Ruby). Lucky for me, it also allows you to extend this set by defining your own formats. I'm going to define a 'FitNesse' format that will output the wiki tables for me directly. To do this, we need to write a bit of JavaScript code:


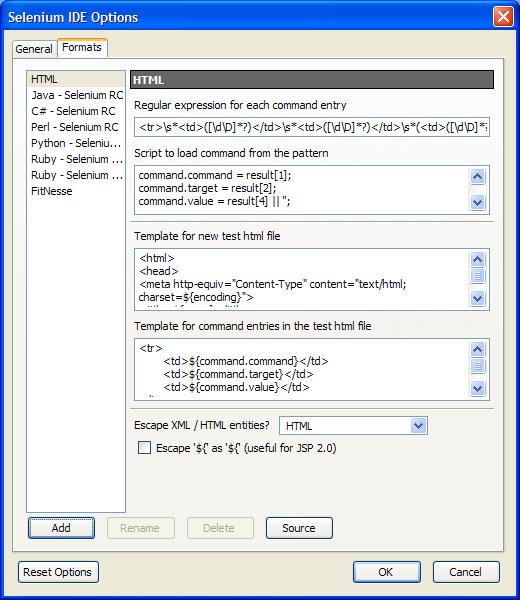
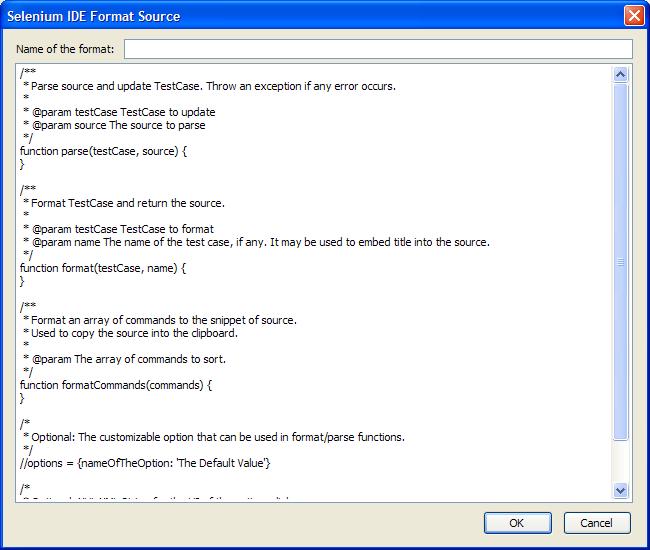
Go to 'Options->Options...' and click on the 'Formats' tab. From here, notice that all the supported language formats are listed. Each format is defined by some implementing some methods in JavaScript... click on 'HTML' and hit the 'Source' button at the bottom of the page to see an example of the code necessary for a format. Several methods are defined defined here, but just remember that the basic operations are to convert testcases to your format, and convert your format to testcases. Additionally, you can define XUL interface elements to control options for your format. Since I only need to get wiki text from my testcases, I'll write a partial implementation that does only the testcases->format conversion.

Click the 'Add' Button and type 'FitNesse' for your format name. Notice that Selenium provides the method stubs and comments for the methods you need to implement.


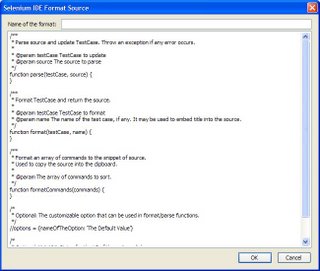
In the source pane, I defined the following JavaScript methods for the testcase->FitNesse conversion. If you get stuck, or want to implement more of the functionality, check out the HTML format code again or the online docs for reference. Of course, swap in your own specific values where appropriate:

 var verifyTextPresentCommandTemplate = "|${command.command}|${command.target}|";
var defaultCommandTemplate = "|${command.command}|${command.target}|${command.value}|";
var selectCommandTemplate = "|Choose|${command.value}|from select|${command.target}|";

/**
* Format TestCase and return the source.
*
* @param testCase TestCase to format
* @param name The name of the test case, if any. It may be used to embed title into the source.
*/
function format(testCase, name) {
return formatCommands(testCase.commands);
}

function getCommandTemplate(commandStr) {
if (commandStr == 'type')
return typeCommandTemplate;
else if (commandStr == 'verifyText')
return verifyTextCommandTemplate;
else if (commandStr == 'verifyTextPresent')
return verifyTextPresentCommandTemplate;
else if (commandStr == 'select')
return selectCommandTemplate;
return defaultCommandTemplate;
}

function getSourceForCommand(commandObj) {
var command = null;
var comment = null;
var text = '';

if (commandObj.type == 'command') {
command = commandObj;
command = commandObj.createCopy();
var template = getCommandTemplate(commandObj.command);
text = template.replace(/\$\{([a-zA-Z0-9_\.]+)\}/g,
function(str, p1, offset, s) {
result = eval(p1);
return result != null ? result : '';
});
}

return text;
}

/**
* Format an array of commands to the snippet of source.
* Used to copy the source into the clipboard.
*
* @param The array of commands to sort.
*/
function formatCommands(commands) {
var commandsText = '';
commandsText = commandsText + '!|josh.SeleniumFixture|\n';
commandsText = commandsText + '|start browser|firefox|pointing to host|localhost|on port|5555|with url|http://localhost/|\n';
commandsText = commandsText + '!';

for (i=0;i<commands.length;i++) {
var text = getSourceForCommand(commands[i]) + "\n";
commandsText = commandsText + text;
}

return commandsText;
}


With that defined, we're really ready to go. Go to Google in your browser and start a new testcase in Selenium IDE. Under 'Options->Format', choose your newly created FitNesse format. Click around on Google in the advanced options, generate a search page, and highlight some text, right-click, and choose 'verifyTextPresent...' from the context menu. Now stop the test and click the 'Source' tab of Selenium IDE. Notice that it has nicely generated complete wiki table entries ready to insert into FitNesse!


Copy the text, create a new FitNesse wiki page, and paste it in (be sure to define the command and path variables and add a command to start the browser, or modify the script to do so)... from here on out you can create new tests or update old ones in FitNesse just by recording your browser sessions with Selenium IDE.

Having the combination of the Selenium IDE recorder and FitNesse wiki-editable formatting is a great thing. When the UI changes or grows, all that is required to add or update the tests is to record using the changed pages or edit a wiki table directly. FitNesse lets me collaborate with other team members, write extensive inline documentation, change tests independently of build cycles, do data-driven test setup, and reuse test fragments via suites, includes, and symbolic links. Finally, driving Selenium RC with FitNesse gives you multi-browser code coverage with a wide variety of hooks for automation and continuous integration tools. There's still work to be done to fill out the fixture with full Selenium RC functionality, but you only have to add functionality according to your needs from Selenium, not when your web app changes.

Sunday, July 23, 2006

Setting Up Apache Derby Plugins with Eclipse

I recently needed to do some development with Derby, the all-Java embeddable database that's now an Apache project. Since I use Eclipse for development, I noticed that there was a plugin available for development. Here's how to get the plugin setup up in eclipse. Note that I go the non-source route whenever possible. If you're looking to poke around in the source or make changes, you'll have to follow the instructions on the Derby website.
  1. If you haven't already, install Eclipse. I was working off of a new laptop, and grabbed v3.2.0. You'll need at least 3.1M6 to use the Derby plugin according to the docs. Download, unzip, start.
  2. Download the latest Derby release. I snagged 10.1.3.1. Unzip it to a folder
  3. Download the derby_core_plugin_10.1.1.zip file from the downloads page. Note that I couldn't find the exact copy, but rather a 10.1.2 version. All the better, right? It's located in a link labeld 'zip'.
  4. Here's where confusion sets in. The docs on the Derby site say to install the core, ui, and plugin.doc pluggins, but the referenced .zip only appears to contain the core. Where to get the UI plugin from? That's when I start actually reading the instructions carefully. To get any sort of UI functionality from Derby in eclipse, you must extract the UI and help source via svn and build it manually.
  5. At this point, you need a Subversion client to get the source. You can either a) Use SVN command line to checkout the source locally, or b) use the subclipse plugin to check it out from eclipse. 'A' is easier in this particular instance, but I normally use 'b', so I'll describe it here. 'A' users can safely checkout and skip forward to step 13.
  6. Since this is a fresh install of eclipse, I don't have the Subversion plugin installed. Thankfully, the Subversion guys do it right, and have a link for use with the eclipse update manager. A mere 15 clicks later (totally unworthy of writing about, see here for instructions), I'm ready to go with subversion.
  7. Now for the fun stuff. Open the subversion repository view by going to Window->Show View->Other and selecting it from the tree.
  8. Now add a new SVN repository by clicking on the toolbar icon shown:
  9. Enter the url given on this page. At the time of writing, it was
    https://svn.apache.org/repos/asf/db/derby/code/trunk/plugins
  10. Now in your SVN Repository view you should have an entry for the derby site. Right click on it and select 'Checkout...' from the menu. I chose 'Check out as a project in the workspace'.
  11. We actually don't want a direct project from the checkout, since we are checking out a tree with 2 projects in it. I named the project 'DerbyPlugins' and hit 'Finish'.
  12. Once you have your 'DerbyPlugins' project, this means you have the source tree and an eclipse project around it. We want to delete the latter, and only the latter, so right-click on it and choose 'Delete...'
    In the dialog, make sure to choose 'Do Not Delete the Contents' and hit 'Yes'
  13. Now you want to create the real projects. Choose File->Import...->Existing Projects into Workspace. For the root directory, navigate to your workspace and find the 'DerbyPlugins' folder. Now find the eclipse/org.apache.derby.ui folder and hit OK and Finish to close the dialog.
  14. At this point, you can skip to the next step, or test it out. To test, choose Window->Open Perspective->Other->Plug-in Development. Then right-click on your project and select Run As->Eclipse Application. This will launch a new eclipse runtime with the plugin active. You can create a new project in the new runtime, and you should have an Apache Derby option on it's right-click context menu:
  15. To create the deployable plugin, right-click the project (first close the 2nd eclipse window if you did step 14) and choose Export... In the resulting dialog, choose Deployable plug-ins and fragments and hit Next:
  16. In the next page, make sure that the org.apache.derby.ui checkbox is checked. Choose 'Directory' as the destination, and give it a folder to output to:
    Under the 'Options' tab, clear all checkboxes:
    Hit 'Finish'
  17. Now you have a deployable directory that just needs to be copied over to your eclipse install. Navigate to the folder you chose to output to in the previous step, and copy the org.apache.derby.ui_1.1.0 folder. Now go to your eclipse home directory, find the plugins folder, and paste it there.
  18. Restart eclipse (If you have a FAT32 filesystem, you will likely also have to follow the directions here to workaround an eclipse bug with this type of plug-in install). Now when you right-click on a Java project, you should have an Apache Derby menu item. Adding the Derby Nature to a project will add the necessary jar files to develop with, and also give you subsequent access to the Derby tools.
That's it for the install. Hopefully it was all worth it, but I'll find that out soon enough. If you want the docs installed also, go back to step 13 and do it for the org.apache.derby.plugin.doc directory as well.

Monday, July 17, 2006

Lego NXT Impressions


I should've got on this sooner. From reading online, I was one of the first recipients of a shipping Lego Mindstorms NXT system last month and I really could've had an early scoop, even before Gizmodo. I was on the waiting list all of one day before I got the shipment notification, and then was off for a 1 week vacation.

But that's not the real reason. I'm actually behind b/c I had a legitimate use for the NXT - it's part of my thesis project on controlling devices with dynamic bluetooth UI's. So for the first non-vacation weeks of my system, I spent it hacking, researching, and begging for early open-source info... especially on the byte codes to directly control the NXT over bluetooth, without any LabView programs.

I'm happy to say that it looks like that part of the project is going to be a success, although (for reasons I'll post later), I'm still very anxious to get ahold of Lego's upcoming developer toolkits. I had to do some serious online begging to get the byte-command information to drive the NXT outside of the LabView environment.


So, impressions from someone that had a real reason to use it (however convenient)?:
  1. It's very easy to get started. The kit has some worthwhile projects to build out of the box, although you'll need to follow instructions in the labview environment for some.
  2. LabView is really interesting. Somehow I've gotten an undergrad degree in computer engineering and 75% through a Master's in software engineering without ever using it. I know this is a simplified version, but thinking from a non-programmer's perspective, it could be highly functional and even intuitive. That said, from the programmer's perspective, it's limiting, and gets very cluttered very fast for relatively simple programs.
  3. Having bluetooth built in is a huge plus. No problems connecting to my PC and downloading programs. However, it appears to be a somewhat proprietary communications format on top of the serial port profile that adds mailboxes and severely limits message lengths. That was very bad news for my project. I'm sure this simplifies things greatly for the non-BT crowd though.
  4. Too little memory, as others have noted. The thing should really just have an SD slot
  5. I really wish there was 1 more motor and motor port. All of the ideas I had required 4 degrees of movement, which is not possible (although 3rd party vendors will likely have a solution for this soon).
  6. The support for the NXT by the newly released Microsoft Robotics Studio was a pleasant surprise. They require an intermediary PC to process and send commands to the NXT, and it ultimately inspired a partial workaround in Java to the BT message length limit problem.
  7. It's been about 20 years since I last used Legos, and sometime during that point I unknowingly lost my patience for hunting for the right tiny plastic pieces in a pile of other plastic pieces. I used to live for it as a kid, but now I kind of wished it shipped with one of the robots pre-assembled.

All in all it's a very promising kit. The fact that it will be open source will likely drive a wave of usefull API's and toolkits that will make the platform invaluable. I'm just glad, at 32, to have a valid reason to buy Legos again.